Posts

Showing posts from 2010

THANK YOU MY FRIENDS!

Image
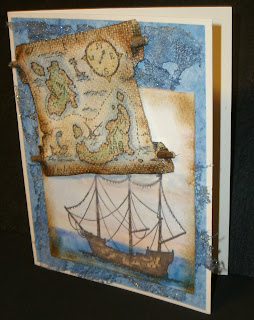
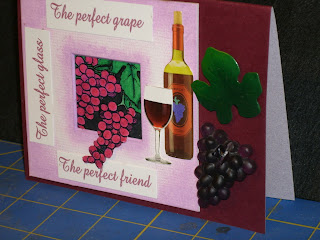
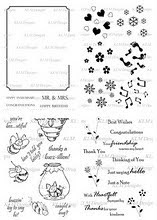
So far behind in my posting and this is the last day of the year.....oh my! 2010 has just flown by. We have been blessed many times this year, and so thankful for each blessing, especially the two new additions to our family. This blog has been an artery for making new friends and a gift that has gotten me through the tougher times. I am so thankful for all of you that have visited my blog and have left kind comments. I am sorry if I didn't get to your blog or had time to leave a comment. I will try to do better in the new year. ( my ONLY resolution, as I don't normally make resolutions) The following 3 cards I did for Vicki Romaine's challenge Past Times. If you haven't entered yet NOW is the time. http://cheerfulstamppad.blogspot.com/ Stamp from Rubber Stampeded; w/ postage stamps, lace and a rhinestone to finish the hanging off. A picture of my Great-Grandfather and his two brothers: Stamped images from Inkadinkado This is a picture of my Grandmother's sister on

DT Holly

Image
Challenge 5, over at cherrfulstamppad is Deck the Halls. Don't ya just love Christmas and all the colors? Here is a simple card using Hero Arts holly and Sentiment from Stamping Up. The holly was colored and trimmed, then set onto a dotted embossed background paper. Below that is the sentiment on a double cut out from the Cricut machine. All was mounted onto a glossy red and then onto the card. A little red satin bow finished it off. This should have been a very quick and easy card to make, it took me all morning!!! I couldn't get a square piece of paper, then I couldn't get the sentiment centered and the....and then.... This is easily a 20 minute card!!!! LOL Some days I need to go back to bed and start over. That all aside you need to hop on over to the CheerfulStampPad and join the challenge!

One for LO-LO

Image
That means one for Lori, she calls me LA-LA, ya know, the first two letters of our name, guess ya need to be here! She is the one person that got me back into stamping again, just a year ago, plus a couple of days. All she said was "Why don't you stamp anymore?" So I made her a funny little card, which she has on her desk at work. Just to show her I have come quite far this year ( thanks to all my blogger/stamper friends and their inspirations ).This card was created for her. A new stamp from, you guessed it INKADINKADO was the inspiration for this card. As it lay there, unopened, next to my elbow as I was finishing up the last two projects it kept saying "Use me with the old lady, use me with........well ya get the idea. LOL She is a stamp from Idlwild, and is very used and loved dearly. This card also holds my first grunge paper flowers. I just learned to make them yesterday! YEAH! Plus some lace and pearls were added and all layered onto a black and white

WOWW

Image
NO time to clean it up I'm between swaps and challenges, and a full time job. Geeesh what a mess! Oh ain't it fun?

Harvest Time Down on the Farm

Image
I'm not on the farm, but they are harvesting almonds right now, in this area; not nearly as pretty as the harvest in the back of this ole Ford truck. This stamp is from PSX, colored with markers then trimmed out and layered onto a tan a green check. The background is an embossed dot layered onto a dark brown, and down at the bottom, yep! you guessed it a scrapling!!! The scrapling was stamped with pumpkins, trimmed, layered onto the same dark brown, and then onto the gold paper the back ground is cut from. Raffia ribbons or green, tan and faded red tie at the end. Here is the inside view of the scrapling. Just a little Happy Harvest. I was asked what I had planned on doing with my scraplings. Most of them will be gift cards, but I thought I would try one as an embelishment. What do ya think?

Make a Wish

Image
I finally finished my birthday card for my DIL. There isn't any stamped images this go around, just textures and embellishments, but I like the way it turned out. The flowers and sentiment were cut out with my Cricut, then the flowers we layered and made 3-D. Pearls from the ribbon embellishment were added to the centers. The vine and leaves were from a ribbon shipment from Really Reasonable Ribbon. It all lays on an embossed piece of paper from Thomas Kinkade, then mounted onto a white card. Make a wish was cut from lavender glitter paper and layered onto a solid lavender cs. It was fun leave the stamps alone and just cut things with the Cricut, nice change.

WOWW

Image
Only Tuesday night here is California , but this picture isn't going to change before the morning. It has been a long day, and tomorrow I get to do it again!!! LOL. I am working on a couple of swaps and thinking about Halloween, should be working on DIL B-day card. The ideas are forming, maybe tomorrow night, when I know I don't have to get up early I'll stamp till midnight! Stay tuned..........................

GC67: Random Redhead Challenge: Go 3D

Image
I know I am running late to enter this card at the http://gingersnapcreations.blogspot.com/2010/08/gc67-random-redhead-challenge-go-3d.html I just finished this card, and what fun it was (always is when a plan comes together) My 3D element are the sticks running through the treasure map, in fact they hold the map out away from the card, the other element is the embossed dryer sheet ( as today I am doing laundry ). The ship was stamped on water color paper and actually painted with water colors. These are old stamps I have had for years, but haven't used them much. The map is stamped on a hand made paper, that reminded me of a cloth. Thanks for checking it out, comments are always appreciated.

GC67: Random Redhead Challenge: Go 3D ALL ABOUT THE WINE

Image
I was getting ready to pop this card into the mail when that little light goes on ( yep that's the realization light ) I made this card for a swap and set it aside until I got my swap partner, and forgot about it. Today I rec'd my partners name, that is why I was getting redy to put it in the mail. ( I know ,who really caras get on with it !) I trimmed the stamped image of the grapes so one bunch would come out over the picture frame. The sentiments are PC generated, the glass and bottle are stickers; and my 3D element is the grapes and the metal leaf to the right. Sorry the picture is a little dark.

GC69: Chestnut Theme Challenge: Ancient Ages

Image
Ancient ages always brings to mind ( or mine anyway ) the great Roman and Greek architecture. ( could be all that art history I took in school ) And since the outer walls of the Roman Coliseum is made of travertine, that is what I chose for my background, or backstone ( ooooh, booo! hiissss! ) I know that's bad, bad! I used 3 different sizes of travertine tiles, they total 6" high and 8" wide. I got to get out some of my favorite stamps for this project. They are from Beeswax, Frantic Stamper, Uptown Designs and MJ Barber. I did a few images then scrapped acrylic paint (from the tube type) over them, then stamped more images. When everything was pretty well set I used Tom Holtz Vintage Photo ink and aged the edges of each tile. They are mounted on a picture frame I had been meaning to throw away. Instead I painted the frame and hot glued the tiles to it, now it sits on a small easel here in my over crowded craft room. ;)

Autumn colored scraplings

Image
September and it is still over 100' here, but I still feel the call to start using autumn colors. My favorite time of the year , until Christmas!! So here is a set of 4 scraplings I just finished, in gold tones with black and brown inks. Almost every stamp came from a different co., so please forgive me if I don't list them all, I'm still feeling yucky, and the heat just isn't helping.

More Scraplings

Image
The last 10 days have been sooooo busy around here, between taking a 4 yr. old shopping ( and not finding anything that is still summer wear, hard to buy long sleeves when it is 107' ) then, it was get ready for the big B-day party; oh my Grandma hasn't gotten a gift yet. So off to shop after work. Getting off a 6PM only leaves a couple of hours to find it and buy it!!! Tracking down the Twinkle toes from Sketchers was the biggie! I did manage to get a few more scraplings finished after my youngest son and DIL left. Oh and they are expecting a baby in December! ANYWAY, I'm so tired tonight I can't remember who's stamps I used, then they wouldn't lay flat on the scanner ( bummer!) I guess it is Monday for the whole 24 hours.....LOL. Such fun little things to make, but now I have to decide which ones will be sent off for the swap. If you are interested in swapping some scraplings Gingersnap Creations has one open to all at: http://gingersnapcreations.blogspot.com

I had to share this e-mail from a friend...God love Her

Stranger In My Mirror © Rose Madeline Mula Please be careful. This person has found her way into my house and could also get into yours. A very weird thing has happened. A strange old lady has moved into my house. I have no idea who she is, where she came from, or how she got in. I certainly did not invite her. All I know is that one day she wasn't there, and the next day she was. She is a clever old lady and manages to keep out of sight for the most part, but whenever I pass a mirror I catch a glimpse of her. And, whenever I look in the mirror to check my appearance, there she is hogging the whole thing, completely, obliterating my gorgeous face and body. This is very rude! I have tried screaming at her, but she just screams back. The least she could do is offer to pay part of the rent, but no. Every once in a while, I find a dollar bill stuck in a coat pocket, or some loose change under a sofa cushion, but it is not nearly enough. I don't want to jump to conclusion

My first scrapling.

Image
Scraplings are a mini type card that is 1 1/2" wide and 4 1/4" long, or the other way around. They are made with paint chips or sample paint strips from local paint retailers. Since I keep forgetting to pick some up while in the neighborhood, and the nearest place for me to get these is over 10 miles away. I'm not crazy about the little white line between the colors, so I made my own. When the sweat from my water bottle fell onto my chip I just moaned, and put it aside. When I saw what it looked like when it dried, I added a few more drips and kinda manipulated them, very cool. LOL Out came one of my dragonfly stamps and a charm to finish it up. Don't ya just love it when an OOPS! becomes just what ya were looking for? Now onto getting 4 done for the Gingersnap challenge. Don't belong to the Gingersnap Creations group? go to this site and sign up: http://groups.yahoo.com/group/gingersnapcreations/ It is a very fun place to be, and the groups is sooooo

WOYWW

Image
Well, here it is in all it's glory.....my work station. I'm getting ready to start some scraplings for a swap over at Gingersnap Creations. Just finished 3 other cards for swaps, so the station is relatively clean for the moment. Tomorrow after work I'll get started on the scraplings ( color chips from the paint store ) Since I keep forgetting to pick some up, while in that area I just made my own. =-O I don't like the white strip that separates the colors anyway LOL. I know it looks like I work in the dark, but there really is very good lighting there, I just had to turn off one and point the middle one down for the picture.

Time To Hit The Road

Image
FINALLY! After 5 attempts I got this card finished I knew what I wanted to do, but just couldn't get it right. What the scan doesn't show is the image is done with paper piecing, then it is also stamped on the acetate and over laid on the paper piecing. I did it this way because I did some painting on the back side of the acetate. It is framed with a copper tape I've had for years, that is what hold the two layers together. I LOVE MY DIAMONDS STAMPS! They just seem to fit my sense of humor. This image is VERY close to my DH, myself and our dog Dyna. I have a few friends that will tell you I resemble this old lad when it is Time To Hit The Road!! STAY OFF THE SIDEWALKS LOL!!!

One More summer card

Image
One more time with my favorite sun image. This was stamped on black glossy cs, with a light color pigment then a gold mixed with a glittered embossing powder was put on it, then set. The face was hand painted white, let dry then the yellow and red were added. over the top of the face is Glossy Accents. This was mounted on a satin finish gold, then red glossy. The texture to the right is a fabric softener sheet that I rubbed red and yellow pigment ink on it. Next I added gold glittered and red glittered embossing powder. When it is melted with the heat gun the softener sheet will melt and pull apart in areas. I have done this many times before and you have to keep moving the heat gun to keep from getting one great big hole! All of this sits on a satin gold card with a sun charm added at the lower right hand corner. The glitter in the sun rays and in the fabric softener sheet really do pop in real life. This is one card that is going to be hard to send off in the mail this week. LOL

Lets Link It Up

Image
Ooooh over at Lets Link It up they are giving away the stamp set shown here, from DLM Digital Designs and Clear Stamps, just for LINKING IT UP. Go to http://letsinkitup.blogspot.com/ to how to enter for this give away. It really is a clever thing to do. I've entered and so should you!

Something Different

Image
Well, I know you all think I've been loafing about, not stamping anything or posting. But REALLY I HAVE BEEN BUSY! I just haven't taken the time to scan so I can post. :-O I made this card for a swap and since have changed my mind. It is a rather dull colored card, but it all works together i it's own way, especially if I had gotten it scanned straight! LOL Oh my, should put the scanned just a little lower so I can actually see if it is straight before I hit the button!! I'm not a short person by any means, but it does sit up on a shelf above the PC. OK, I have no excuse, as hard as I have been trying!!! There are three more below this one that I did do since my last post. Right now I'm working on some swaps ( 5 cards to get finished ) the designs keep rolling around in my head ( making a lot of noise ) but for some reason I just can't get them to the paper. OH NO I HAVE STAMPER'S BLOCK!

Water color: soft

Image
This is a card I made with one of my many water color technique turn outs from last month. It was such a soft image the lavender and gray back grounds just seemed to fit it. I added a lavender bow with a charm. In the charm I had stamped love on lavender paper and inserted it. I then filled it with glossy Essentials. Just a simple card.

Water color technique in black, white and gray

Image
I had stamped this Anna Griffin image using the water color technique ( from last month ) in black and then the second time with out re-inking to get the shadow effect. It started out a s a mistake, but I liked it so much I used it on this card. The paper flowers in the upper corner were cut with my Cricut and layered with a dot of puff paint for the center. A black ribbon with a white dash, from Really Reasonable Ribbon runs down the side.

Gingco leaves in 3-D

Image
I had these images laying around that I did some time ago. I had stamped and colored the image then made multiple copies of it, then let them lay around. LOL. The other day I got to messing around with them and this is what I came up with. Using little pot dots I raised the leaves inside the square, layered it on copper and thought now what? I liked matting it on blue and green but it just needed something else. Well, I still had a couple of images left, so I trimmed them out and tucked them here and there and left two in a falling position, with a strip of copper at the bottom. When I get ready to use the card I'll add the appropriate sentiment. Image is from: Stamp Zia

GC64 color challenge-red,orange & yellow

Image
Once again I grabbed by favorite sun flower stamp for the Gingersnap color challenge. This is such a simple stamp and sooo many possibilities! I stamped it on a light yellow cs then used my Tombow markers (? again?) to shade them in. Stacked then in a pretty little basket stamped image and tied a fabric ribbon around it. Polka dots and gingham just seem to go together, so the accent of red cs and red with white polka dot ribbon were added to make the color combo. Check out the other submissions to this color challenge here: http://gingersnapcreations.blogspot.com/2010/07/gc64-color-challenge-yellow-orange-red.html Not only is this blog a great place to hang you art work but the yahoo group is so friendly, and welcoming. ya otta give it a try!

GC 62 sun challenge: My Golden Sunset

Image
If only my Monday had been as peaceful as this little image of a golden sunset. It was anything BUT, headache made me sick to my stomach, car stopped running about a mile from the house; had to walk home in the heat, jeans and dress shoes. Plus I found that my purse weighs about 50lbs around a 1/4 mile down the road! But ALAS I got home took a cool shower and made this pretty little card. The sun was stamped on black glossy cs and embossed with gold. The sun itself was first painted white so the yellow, red and orange would show on the black. I found an old can of spray webbing in the garage the other day, I'm surprised it still worked when I used it on the background black. All are mounted on a metallic gold cs and then mounted on a glossy black card. Check out the other submissions to the Gingersnap Creations challenge here: http://gingersnapcreations.blogspot.com/2010/07/gc63-random-redhead-challenge-sunshine.html

Paper Play Challenge: Blue, Cream + 1 color

Image
Over at Paper Play the challenge is with colors ( ooooh my favorite ) This week it it blue, cream and one other color. check out all the entries here: http://paperplaychallenges.blogspot.com/2010/07/10-week-29-colour-combo.html I decided to use navy blue, cream and a mirrored fuchsia cs. I love the fuchsia and navy together. My swirling lady is from Stamp Tramp and the sentiment is from Stampa Rosa. The sketch is from the Gingersnap yahoo group. If ya haven't joined this group your missing out on some great gals and art!

GC 60 Shades of blue

Image
Over at Gingersnap Creations the shades of blue challenge is still going on for a couple more days. Catch all the entries at: http://gingersnapcreations.blogspot.com/2010/06/gc60-color-challenge-shades-of-blue.html Using an image from the my lights out batch, this card came about. There is just something about coloring the image with markers and then spritzing with water that I love. I think my Prisma colors are getting a wee bit jealous! LOL This "water color" image just kept saying KEEP IT SIMPLE. ( am I the only one that hears these little voices?) This tulip is a rather large stamp, so simple is almost a must, unless it is trimmed out then remounted. I must CONFESS yesterday I bought a new stash of 100 markers :-O just to have a better variety of colors to play with. They don't blend as well as my Tombows but they are going to be GREAT for this technique!

GC 62 #2 Supply challenge - Markers

Image
So what have I done with all my "water color" images from the night the lights went out in Shafter? Well I created this card for a second entry in the Gingersnap Creations marker challenge! http://gingersnapcreations.blogspot.com/2010/07/gc62-spicy-supply-challenge-markers.html Well, brown is not usually the color I pick for this flower, but I do like the aged look it gave the image. It is from Anna Griffin. I used a couple of shades of brown markers on the stamp, then spritzed with water and stamped the image on a tan cs. Once it was dry I tore around the edges, aged with some ink and wa-la! The square is a mother of pearl tile that fell off a sheet of them at work.......lucky me! LOL

GC61: Chestnut Theme Challenge - Heat

Image
Here is a red HOT little tag I created for the Gingersnap challenge. Believe me when I say it has been HOT here is southern California. We have had a week of over 100', supposed to only be 102' today and then drop to 99'. ( I may have to find a sweater LOL ) The GC site is where to find this HOT little challenge check it out at: http://gingersnapcreations.blogspot.com/2010/07/gc61-chestnut-theme-challenge-heat.html I used a large 3 3/4" X 5 3/4" laminate tag for the base. It was on a chain of samples when I worked at the cabinet co. Over the top are layers of many things, ink stained paper towel, embossed fabric softener sheet, tissue paper and mulberry paper. The sun image is stamped on light yellow tissue and then decoupaged onto the top of the tag. The letter were stamped onto an ink dyed water color paper, then trimmed out. A red deco with my Cricut, brass charm and yarns finished it up.

The night the lights went out in Shafter

Image
I was busy coloring stamps with my markers, then spritzing them with water, then stamping. Just having a good ole time, the music blasting from the PC, trying this, then trying that. BOOM! no power. Geesh! This house is past dark and way into black when the lights go out! Well, anyway, I did manage to get a few images stamped choosing different colors and different papers. This all came about after visiting this blog spot: http://stempelatelier.blogspot.com/2010/03/voorjaar.html Mine are absolutely not even close to the beautiful images Elli has made with the same technique. She also has a to-die-for-stamp for this. You need to check it out. Now that I have "played" with this technique, and made more than enough images, guess I'll try a few different layouts, hopefully the power will stay on tonight. It is still in the 90's and it is 8:30PM here.........and HUMID. NOT a typical CA heat wave, and I need that A/C working tonight!

GC62 Marker challenge

Image
Using markers for coloring an images IS a challenge for me. I prefer colored pencils that are soft and blendable, markers always seem so flat, or the stroke marks turn me off. Today I started with a glossy cs and three colors of pink and really practiced blending with them. This has really given me a deep appreciation for the cards that all of you make with markers. This card took me almost all day to complete! I guess I could break down and try some Copinks, my old Tombows are a little hard to work with. Any other suggestions, leave them in my comments I really would like to know what all of you "ink" girls use.

Reorganization

Image
Since I can no longer stand and create I have had to make some changes to my stamping/craft/scrapbook area. Some may remember that this is the wall where I stood, now it has things that I don't use but occasionally, and for scrapbooking. Hey I can actually see AND use them with out moving something to do so! LOL I had to do some major sorting and sorting and figuring out how to down size and make it work. I cleaned off this work area, and I do mean cleaned, and made this the area I NOW use for creating cards and stamped art. I have a tall stool to sit on, that is perfect. Those little black cabinets under the counter top are my wine coolers. ( oh yeah, both red and white ) Most of my stamps and supplies are still in the cabinets on the long wall, but the necessities are at my finger tips. Once I clean off the upper shelf, I'll but my boxes of stamps there to make them a wee bit closer.

My blue bulletin board-Thanks Hels

Image
I had been planning on getting a bulletin board for my stamp area for some time. This one was my Mom's and had hung by the phone at the back door for years. As I was cleaning out her house I pulled it off the wall and brought it home. She had glued something on it, probably hooks or stick back calendars; then pulled them off leaving some areas a little thin, but adds character. While wondering through the blogs I follow, Hels Sheridan had a blue challenge for this week and I thought "Blue would be a good color for that bulletin board." Well, that was all fine and dandy, until I found I have NO BLUE PAINT! =-0 Okay, so I had to think and ponder on what I could use that is shades of blue....hummmm. I ended up using some blue inks and white acrylic paint. Since the inks are water base I had to spray a sealer on it every so often so get a layered look. Using a couple of flower stamps and a dragonfly I added some images. I used some less expensive felt tip pens to

Just for fun some oldies

Image
As some of you know, I lost my Mom last month and going through her stuff I found these in a scrap book. Now I told you I have been doing this for a LOOOOONG time and here's the proof! LOL The long card I colored in first grade; the teacher said we had to do our best because we only got one. Well, I colored my carnation a very pretty blue, she took it away and said there was no such thing as a blue carnation and gave me a second one. Now ya have to remember this was back in 195..........! The smaller of the two was from the 11th grade, I had just learned to draw a rose.......sort of. I kept them to show to Hanah as she loves to make cards with Grandma Krisha. Of course they will now go into my scrapbook.

Lazy Hazy Days of Summer-Sir Stampalot

Image
For this challenge I went a different direction form most people. Lazy hazy days of summer mean hitting the beaches of California. My kids would probably say this is a self portrait! LOL except we are about 200 miles north of San Diego. The background is a scan of a really cool coaster from a place we had lunch at, it is a nice chip board coaster and just seemed to fit with the image ( even if it is an advertisement for beer )

Final 3 thank you cards

Image
Well, here are the final 3 thank you cards. I did manage to pull some already made cards that would fit the purpose. The green one is for a friend that came and really helped out. The blue flowers are layered onto a metallic background that....., well ya know how things go when ya scan them. LOL

Stamp Something Challenge-Show Me Your Colors

Image
While cruse'n through the blogs I follow, I came across this challenge on Stamp Something, AND since tomorrow is the 4 th of July this wall hanging came about last night. I know, I should be working on more thank you cards, but ya know how it is when inspiration gets in the way LOL . I used a chip board for this, spray it white then used inks from Posh Impressions to lay out the background. With the inks being water based I then had to seal it with a spray mat sealer. Once everything was dry I took an old acrylic file to the edges. Using Tom Holtz's Vintage Photo ink I aged the edges, then sprayed sealer again. The image is also from Posh Impressions, after stamping it with black ink I sponged red and blue at an angle and aged with the same Vintage Photo ink. A small red, white and blue looped ribbon was added to the lower right corner and three star brads. It all hangs from red, white and blue glittery fibers.

Quick Thank You Card

Image
Well, I completely missed posting for the month of June. Unfortunately it was because my Mom went down hill and I had to put her in the hospital where she survived for four days, before the angels came and took her home. The longs days at the hospital were brutal, I got home checked up on the lists that I belong to, checked up on Friends on Facebook and then hit the pillow. She passed on the 18th but there was 47 years of stuff to get out of her house, all the while a family member was moving in upon my request ( couldn't let the house set empty when the neighborhood found out she was gone ) Marty, the family member, had known my Mom for years and she has been a God send in cleaning and sorting. So, now that things have cleared up a bit I have started making my thank you cards. It is really hard to get the mojo going, but a swift kick in the lower mojo and some challenges have helped me get back on track. This was the first of three, plain and simple, cut with the Cricut, wit