Posts

Showing posts from 2012

WOYWW 186

Image
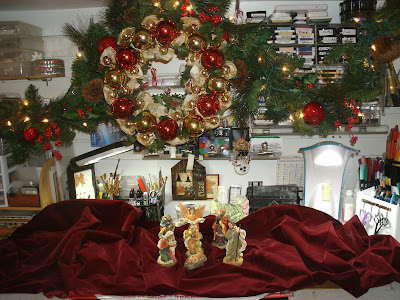
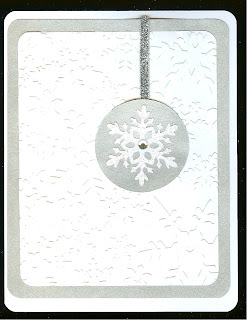
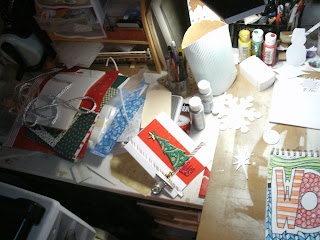
 Whats On Your Workdesk Wednesday???? Created by Ms. Dunnit over on the Stamping Grounds blog, entitles us to go a snooping around the world, peeking at what other people have on their workdesks.  This week the snap of Betsy was taken by my NEW Nikon D7000!!( Santa does love me. ) I am not going to itemize, most of you know what everything in this picture is.  My art journal is propped up because I was checking out some of the settings on the camera. To the right is a stack of four packages of Recollections markers, also from Santa.  As you can see I am marker poor......LOL But they were 50% off just before Christmas.  I bought the first set for Hannah (our GD) and told DH I wish I was buying them for me.  He replied go for it and get Hannah a different set.  SO I DID!!! LOL  I picked up art supplies and cases for them for the two oldest GDs and everything was 50%!! Keeping it short, this is a closeup of my journal pages.  Lot of ink, modeling paste and splashes of water.  I

WOYWW 185

Image
Whats On Your Work Desk Wednesday (?) Well Tuesday night here in the USA.  Well here is Betsy all decked out in her Christmas trimmings to wish all our WOYWW guests and all our blog friends  A VERY MERRY CHRISTMAS!   Don't forget to go by Ms. Julia's to be able to take a peek around the world at other WOYWW players http://stamping-ground.blogspot.com/

A Special Gift for a Special Friend

Image
So I had this grandiose  idea that I was going to stamp my own gift bags and wrapping paper this year, until I remember the Santa issue (see my last post) I did manage to get one gift bag and tag made for my friend Cathy (she has already received it so I'm safe here)  I used Inkadinkado reindeer and sentiment with gray ink for the bag and for the tag, but embossed with silver on the tag.  I added lace and a silver and white trim around the top of the bag, finishing tag and bag with velvet poinsettias and a rhinestone for the middle. The ribbon with the reindeer I found at Michael's, what a coincidence!! The bag is full of baked goodies (see last post for this too) but I did add her gifts to the top of the goodies. Here is what the gifts looked like.  I purchased a white roll of shipping paper for this.  I used the same stamps and gray ink for the paper, then tied a wired ribbon around  them, I did two exactly the same, so there is only one picture. We got together for H

I'm Almost Ready......

Image
only a few more quick gifts to finish.....BUT  by staying off the PC and my blog I have managed to get quite a lot done. (imagine that!!)  I finished off my Christmas cards with these two. First one I used Darci's snowflake embossing folder for the background, and layered that onto a silver cs. I cut the snowflake out of a glitter cs and mounted that onto the same silver cs with a silver ribbon, and added the rhinestone in the middle. Of course rounding all the square corners. This second card I used a digi image from Gecko Gals, coloring it with markers, then blending.  This scan doesn't show that I also covered the image with Sugar Dust (going back to some OLD stash).  The star is a metal charm (again from the OLD stash)  It was put together the same as the first card. So all the cards were finished made and sent out last week.WAHOO! So what have I been doing the rest of the time I have been MIA? Two days of baking Biscotti, cookies and S'more Bites

NOEL TAG CARD

Image
Quick post this morning of the tag card shown on Betsy for WOYWW.  Finally did a little touching up and added the ribbon.  The digi is from Retro Cafe, I just added pearls on the buttons and some snow at her feet.  Card was cut with the Cricut.  The front has an over-lay piece that was dry embossed with a snow flake folder, the noel is from Inkadinkado. A little trim at the bottom, pearls and a poinsettia finished it off. I really need to rake our leaves, both yards now appear to be golden. DH usually has this honor, but is so busy working unusual hours hasn't had time.( the pit falls of being an owner/operator of a big rig) back yard  view of front yard from the front porch   Funny those exact leaves looked so pretty ON the tree. LOL  Well, now it is raining, so the leaves get a pardon for today. I don't really like raking wet leaves, so messy, but I do mind getting soaked while doing it!! Besides there are still some that are hanging on the tree for dear life

Christmas Cards and the count down......

Image
Okay, so there are 20 more days until Christmas and I am still making my cards, so 2-3cards a day for 20 days........that should about do it.....LOL  At this point I will make them as needed for friends.  Family can always get theirs hand delivered!  I am trying to keep them fairly simple, and light weight.  This first card is an other chip board piece, the holes were punched so I removed them, painted the tree and backed it with a gold cs, added red paint and glitter to the base and some very tiny rhinestones to the tree, and digging around in my stash found a rhinestone star for the top of the tree.  The red background paper is a stash piece that also has metallic gold showing through in places.  Ribbon and a reindeer charm finish it off.  The scan looks a little dull but it is a very bright card. This second card was a quick and simple card.  I embossed the background paper then rubbed a gold embossing ink pad over it and added gold embossing powder.  (say what??)  When I was q

WOYWW 183-Journal & Panic

Image
Left side of Betsy: pile of Christmas paper, card in the making, items with a coat of Gesso......... The center of Betsy: Items that received a coat of Gesso and art journal, paint along the sides waiting for use........... To the right of Betsy: More items drying, a tag card almost finished, bowl of chip board items that may or may not get used............ Center front of Betsy: My art journal page I did while waiting for Gesso and paint to dry, while watching a couple of Christmas movies (I have to watch them EVERY year)  So what are all these silly pictures all about? Why it's W hats O n Y our W orkdesk W ednesday!!!! Well it is in the UK and Julia gets things all set up for SUPER SNOOPING around the world.   Just drop by: Julia Dunnit's Blog  Beware of the addiction this causes! It has been two weeks since I have gotten to play and I am telling you the with drawls are not a pretty thing to deal with LOL!  I mean, here I am blogging away and all t

Making a quick stop at home

Image
Well, we made it home from the Thanksgiving trip last Saturday  Sunday morning about 2 AM.  What a great trip but soooo much to do when getting back.  ( more on that later)  Last night I decided I really needed a crafting "fix" and sat down  and removed all the chip board pieces, from the large package I had picked up at Big Lots some months ago.  I had an embossed white paper floating in my stash drawer and some snowflake tissue paper I've dieing to tear into, so I decoupaged the tissue to the embossed CS and let it dry. Then the phone rang..................................  So it was this morning before I went back to the beginnings.  I fell in love with this reindeer and covered him with Gesso, then painted him silver.   I played around with the placement then decided to emboss him with silver, then took a silver paint pen and went over the antlers to make them shinny, and added him to the card.  The Inkadikado Merry Christmas embossed with the same silve

Deck the Halls: art journal page

Image
scanned photo Still playing around with my art journal ( and only 2 Christmas cards made, something tells me I might be very happy I have cards left over from last year ) I have always loved pictures of ornaments and that is where the inspiration for this page came from.  Once again I drew it with black permanent pen then use Inktense water color pencils and wet brush for the bleeding.  Once I was that far it looked a little too washed out and dull. Ornaments are bright and shiny.....right?  I started experimenting with different things to make them shiny, I did use a spray set over the water colors before starting.  Nothing was really giving me the effect I wanted :(   I finally got out the dimensional paints and added them here and there, OK that's looking a little better, so add some glitter paint, ok a little better..... Hmmmm!  I wanted a shiny pearly effect, so I went to the nail polish cabinet (yes I have one of those after being a nail tech for 13 years, and having 3 gr

Holly Jolly Santa card

Image
Last year I bought some Christmas stamps from Stubby Stampers ( like I needed more Christmas stamps ) and I really didn't have time to use them as much as I would have liked to.  This little stamp (2 1/2" x 2 1/2") tends to draw my attention.  I stamped the image with TH distressed Vintage Photo ink then lightly colored the image. The edges are aged with the same ink. It is mounted on a metallic gold, which doesn't scan well, then onto an embossed white and finally the holly print. The bottom holly is part of a really old stamp of 3 candles.  It was stamped onto a very dark green print, then trimmed out.  Red pearls make the berries. (I ended up painting the pearls with a red Sharpie )  I added a hand made green swirl and the sentiment is on the ribbon at the bottom.  I added a chip board ornament at the top.  Thanks for stopping by and as always your comments are a welcome inspiration. Inky Hugs Krisha

Frustrated Beyond Belief!!!

Image
YEP! That's me!! PC was in the hospital for a week getting over a virus.  I pick it up Thursday, as they assured me all my pictures and music files had been saved and restored to a clean PC.   I get it home all excited as a kid on Christmas morn only to find out that there are 2 YEARS of pictures missing and a couple of very important document files.  So back it went Friday and they said "no problem, we'll fix it".  Got it back home last night and yep they added the files, and 2 sets of pictures from 2011.  Still no 2012 pictures and about 200 pictures from 2011 are still missing, so Monday I am going back and talking to them AGAIN, no sending DH this time, they are going to have to face a very irate Grandmother, and avid Scrapbooker!  I do know that sometimes a virus can damage picture files, but 2 YEARS worth.  I want them to SHOW me just what they saved. GRRRRRRR!!!!!!   So not having a PC to play with and keep in touch with, I was left a lot of time on my han

I went on the FROSTED DESIGNS BLOG HOP....

Image
and what INSPIRATION there was on every blog!!!!   Here are the rules: It's a Recipe Blog Hop With a FALL theme! Here is what that means... 1. Visit all of our Design teams blog where each Designer will have an "ingredient" for our recipe. 2. Choose 6 of the 12 Recipe items to use on your layout, card or off the page project. Your project can be any theme you like... it does not have to be a fall theme. However, if you do make a fall themed project, your name will be entered twice for the prize drawing! 3. Upload your LO/Card/Project here by midnight Wednesday, Nov. 14th. Be sure to include a list of recipe ingredients used when you post your project on your blog or in your gallery. You must use 6 "ingredients" from the possible 12!   I actually got 11 of the 12 ingredients on this LO!! The trick is to do it and not get things overly busy......how did I do?  The tattered background is a print of fall leaves, just love it a

First Christmas tag

Image
So I'm waiting for some paint to dry on a scrap book embellishment and thought I'd do an other post.  A little backwards as I just posted some tags for Unruly Paper Arts, but this IS the first tag I made,( no cards yet ).  I used an Inkadinkado reindeer stamp with brown ink, some Poinsettias made with TH Tattered flowers, beads for the center and gold glimmer mist over the whole card.  The edges I used gold foil hit and miss to give it that aged look.  A Merry Christmas stamp for the sentiment.  I do believe that is a SU stamp (?) dog chewed the wood and can't read it any longer.....gerrrrr!  So I'm off to check the paint. until later, Inky Hugs

Christmas tag for Unruly Paper Arts

Image
Some Christmas tags I have been working on for the Unruly Paper Arts  Reader Art Quest #1 TAGS for November.  They are large tags, about 7" tall.  I like messing about with larger tags.  I cut them with my Cricut machine.  The stamped image is form Inkadinkado, embossed.  The Poinsettias were made with TH tattered flowers, they were grunged a bit then sprayed with glimmer mist.  Tiny beads make the centers.  The swirls were made with red Dimensional paint, trimmed out then added.  I made sure to leave enough space to write their names on the tags too. Here is a closer view of the bottom Poinsettias.  I also had taken a gold paint pen and went around the edges. Here is a closer view of the top of the tag. Have you checked out Unruly Paper Arts?  Such a cool place for inspiration.  Check it out here: http://unrulypaperarts.blogspot.com Back to work on the scrap book.

WOYWW 179

Image
Tuesday night and Election night, here in the States  It's a close race and I keep jumping up and running to the living room to keep tabs on it. ( Hey, I'm getting some exercise tonight LOL ) It is getting close to the end, only a couple more hours. BUT in the UK dear Julia has posted WOYWW: What's On Your Workdesk Wednesday. She gets it going early for all us Yanks to get our desks post too.  What am I yabbering about? A trip around the world through your PC, looking at other people's work desks!!  If you haven't given it a try you should go here: http://stamping-ground.blogspot.com/2012/11/woyww-179.html So what has Betsy got in store for you this week? Wooha, I've started playing with Christmas! From left to right there is my blog journal, almost empty roll of trim, happy birthday stamp, dink coaster, 2 small boxes ( from Michael's today ) they are for my Granddaughters to decorate as Christmas gifts, water pot with a wooden bracelet that will beco

New art journal page.

Image
Hope everybody had a creative weekend.  The DH and I took the "playhouse" out for a maiden trip over the weekend.  We went up to Tehacahpi, a small mountain township about an hour from here. Kids and Grand kids came up and spent Saturday night with us.  While waiting for them to arrive I got out my art journal and started playing.  I drew it first with a black felt pen.  I used some water color felt pens to color it in, then took a damp paint brush and ran the colors outward, crating the background colors.  Once it was dry I add a few more details, like the stitching marks, loops around the flowers and some curly cues.  It was a rather quick and easy page to do and I really enjoyed the quiet time before the troops arrived.             Inky Hugs,      

WOYWW? 178

Image
 What's On Your Workdesk Wednesday! Yep it's back again the weekly blog hop Miss Julia created for all of us nosey bloggers.  So tonight ( as it is still Tuesday here in California for an other 45 min .) this is dear Betsy, quite cluttered with an assortment of stamps, ink pads, and scissors.  Not much creativity lurking about on Betsy this week.  I have been busy searching, and cropping and printing photos for a Christmas present for my DIL. I decided to make her a memories quilt.  I've made a couple in the past and they do take some time to make. Getting the pictures cropped and printed take the longest, but I finally got the last sheet printed this morning.  Then a couple hours of cutting them apart and trimming them( oooph! I hate that part )  So here is a pic of the quilt, it's a twin size, meant more for a throw than a blanket.   Here it is all laid out again with all 62 pictures!!  She loves purple, so every picture is framed in purple with a purple and h